Friday, August 29, 2014

Using the Artist's Paint Palette as an Art Piece by Tracey Sabella

Hi everyone! It's Tracey here to share a new project with you. I created an art piece using a page from a Leaky Shed Studio Artist's Palette Album. I purchased a basket of worthless old paintbrushes at an auction last summer for a dollar. I had a vision of using them in some of my projects. So when I saw this Artist's Palette, I knew it would be perfect for a couple of the brushes. If you follow my work, you know that I enjoy thinking outside the box, using items differently than they were originally intended.

"Art Is . . ."

Tips and Techniques
The first thing I did was to adhere a piece of cardstock over the binder ring hole. I then painted the entire palette with a couple coats of white gesso. I was inspired by vintage wooden paint palettes. One of my favorites was so full of old paint, that it was crackled and worn. To achieve that effect, I have used a thick coat of white Viva Crackle Paint. Once dry, I used a variety of mists to color. 

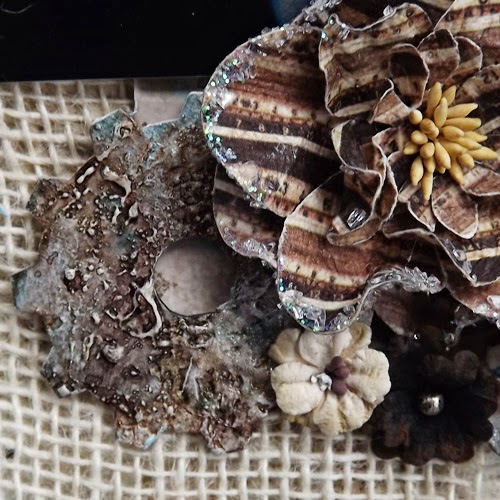
I also used the Leaky Shed Small Flower Corner. I cut it in half for each side of the flower cluster. I painted it with metallic paint. I misted the flowers to color and then adhered the flowers, paint brushes, and chipboard in place. Then I splattered with white gesso and gold paint.

Once the splatters were dry, I dry brushed gold paint over the flowers and chipboard pieces. I also added microbeads and mini marbles at the edges of the flowers. 

The final step was to stamp the sentiment, cut it apart and color with Pan Pastels before adhering to the palette. 

I hope you've been inspired to think outside the box to create
a unique art piece with your Leaky Shed Studio Chipboard!


Leaky Shed Studio Products

For a full list of products used, please stop by my blog tomorrow (Saturday).

Thanks for stopping by today!

~ Blessings ~

Wednesday, August 27, 2014

The Gold Trend with Cathy

Hi Leaky Shed fans, Cathy here sharing a layout created with Leaky Shed's Windmill.  I just had to have this windmill when I saw it in the Leaky Shed Store.  I knew I had a great photo that would pair perfectly with it of a recent day trip.  We were flying down a back road when I spotted this old barn & windmill. I had to have my hubby pullover so I could get some photos.

Lots of companies in the industry are using lots of metallic gold in their paper lines and embellishments.  Loving this new trend.  I wanted to incorporate more gold into my layout and knew the windmill would look great embossed and painted metallic gold!  I love the simplicity of this layout!


Thanks for stopping by Leaky Shed today!
~Cathy

Monday, August 25, 2014

the beginnings of a book--Our Life in the Country?

You may already know that I like to make books.  In my mind, pretty much everything can be turned into a book or album cover, so it's no big surprise what this six pane window is going to become:


It's a little over 5 inches by 7 1/2 inches, which is a great size for a mini album or book.
Used that good old paint/glue/paint crackle technique--perfect for this, since the theme is going to be something along the lines of "Our Life in the Country."
Plus, it comes with a nice big piece of chip for the back cover.  How does that not say "make a book!"????

Have a wonderful Monday, everyone!
:)trisha

Friday, August 22, 2014

Back To School With Leaky Shed Studio and Veronica


Hi, Veronica here today to share my "Back To School" project.  I am a big user of "To Do" list but I also want to have something pretty to write on.  So here is my solution. 

I altered the Leaky Shed Studio clipboard!

 
I also used the Leaky Shed Studio Key #3 chipboard


The Key to Success!

First I inked with brown chalk ink, then I sprayed with mist.  Next I clear embossed and finished it off with black ink.  Love the bubbles in the key.  Use extra heat to get those.


I always finish the backs of my projects.  I want it to be pretty everywhere :)


Thank you for stopping by today, and remember to try out Leaky Shed Studio for any project.
 

Leaky Shed Products Used:
Clipboard
Key #3
 

Wednesday, August 20, 2014

My First Leaky Shed Studio Creation!!!!

Hey everyone!  
I am so excited to share my very first Leaky Shed Studio creation!
After receiving my first package of gorgeous chipboard I was stoked to create this layout of my hubby & I


I love texture and dimension on my projects and
the awesome Leaky Shed chipboard pieces were the perfect embellishment!


Here I used the Gear set amongst my cluster!

Here is a close up of the texture and color


I used gesso, sand gel and mists to create the effect
on both the gears & the 'Cowboy' & the barbed wire border


Leaky Shed Studio Products

Thanks for stopping by and I hope you have enjoyed my first post for Leaky Shed!

~Laura

Monday, August 18, 2014

Decorated Gift Bag

I always love to keep little gift bags on hand that I can decorate to give a gift and add to that personal touch. Today for my project, I went with a country feel making using of a kraft colored bag, a doily, and some gorgeous butterflies from Leaky Shed Studio!
I used the Spring Butterfly Small Set and just used adhesive on their body so that that I could pull their wings up and make them look like they are flying!   Adding a simple doily, gorgeous butterflies,  and a sentiment is all that it took to take a plain boring brown bag from drab to fab!  

Because they match the kraft bag so nicely I left my butterflies in the raw!  If I'm being honest, I kind of love raw chipboard! Next time you are looking to jazz up a gift bag think about your Leaky Shed Studio supplies and how you can use them too!

Have a great week Leaky Shed fans!


Wednesday, August 13, 2014

A notepad to fit my purse--Celebrate Life!

My purse is on the small size right now (okay, yes, I have a LOT of purses), AND it's an odd shape.  So what do you do when you can't find what you want?  Make it yourself, of course!
The front and back covers are from one plate out of the 6x6 Bracket Album, sliced down the middle, and covered with map paper.  A little ink, a little crayon, a rub-on . . .
 And of course the Hot Air Balloon, also covered with ink and crayon. 
 Simply cute some paper to fit the inside, hole punched, and added the ring with some tulle.
This was so easy to make, I'm thinking it would be a good thing to make en masse and give as little gifties, along with a fun pen or two?  And the album comes with SIX of the covers, plus a little one!

Thank you for stopping by my first every Leaky Shed Studio post, and have a wonderful Wednesday, everyone!
:)trisha

Monday, August 11, 2014

Naked Leaky Shed Studio - Veronica Johnson


Hi Veronica here today to share with you some Naked chipboard flowers.  Did I get your attention?  Good :)  I wanted to show you today that you do not always have to alter your chipboard.  They are perfectly cut to show the utmost detail and look pretty just as they are.

I used these beautiful Springtime Flowers and what is clearly one of my favorites the watch parts.


Notice the fine detail in the chipboard.  I wanted to make some natural, rustic tags.  At least that is what I had in mind when I started.  I knew I wanted to add burlap and fabric, then I added some lace and the whole look changed.
 
 
By adding the lace - I felt my tag was more "shabby", so I went with it and added flowers, jewels and of course some white paint.

 
I was in the "zone" so I went ahead and made a second tag with the same color scheme; except this time pronounced the yellow rather than the green.


Thank you for stopping by today, and remember to try out Leaky Shed Studio.
 

Leaky Shed Products Used:
 

Friday, August 8, 2014

3 Different Looks Using Embossing Powder on Chipboard ~ Tracey Sabella

Hello, It's Tracey here to share an engagement layout of a sweet couple who just got married last weekend. I created this to frame as a wedding gift for them. I've featured gorgeous Leaky Shed Studio chipboard around the page.

"Never Let Me Go"

Tips and Techniques
Mixed Media Wedding Layout by Tracey Sabella for Leaky Shed Studio - Embossed Chipboard
As you look at the three gorgeous Leaky Shed Studio Chipboard pieces I've used on this layout, you'll see three different looks. Here are the details.

To achieve this shabby look on the Leaky Shed Studio Harja Flourish - Two chipboard, I first adhered mica pieces randomly here and there with glue. I then applied Perfect Medium (Any embossing pad should work) and sprinkled on Fran-tage Shabby White Embossing Enamel. I left some of the areas only lightly covered so the chipboard and mica chips would show through, then heated the powder to melt.

It's the perfect leafy corner to this flower cluster.

Mixed Media Wedding Layout by Tracey Sabella for Leaky Shed Studio - Embossed Chipboard
Here's another view. You can see how I've gessoed the flowers to soften them.

Mixed Media Wedding Layout by Tracey Sabella for Leaky Shed Studio - Embossed Chipboard
Here's a close-up of the Leaky Shed Studio Double Heart. I've colored it with Blackberry Cordial Glimmer mist, then when dry dabbed lightly with Perfect Medium and lightly sprinkled with Fran-tage Shabby White Embossing Enamel before heat setting. I just used a very small amount of embossing enamel so the purple would remain the main color. 

I've stamped flourishes at the corner before topping with a BoBunny Flourish.

Mixed Media Wedding Layout by Tracey Sabella for Leaky Shed Studio - Embossed Chipboard
Leaky Shed Studio has some of the most beautiful and intricate clocks. This is the Small Clock #2. I've simply misted it to color and then topped with an opaline embossing powder for a pearlescent shimmer. 

I've splattered purple and gold across the page for shabby texture.

Mixed Media Wedding Layout by Tracey Sabella for Leaky Shed Studio - Embossed Chipboard
I've tucked the clock amongst the layers above the photo.

I hope you've been inspired to grab some Leaky Shed Studio Chipboard for your next layout!


Leaky Shed Studio Products

For a full list of products used, stop by my blog, Garden OfGrace, tomorrow (Saturday).

Thanks for stopping by today!

~ Blessings ~