Friday, March 28, 2014

Rocket Ships and Baby Boys

Hello Leaky Shed Studio fans!  Debbie with you today to share a layout that is a part of a new album I started for my newest grand baby, Trexdon.  I'm so blessed to have 7 healthy happy grandkids and scrapping their photos reminds me how good life is.

For this layout I used the Rocket Ship and word Boy chipboard pieces by Leaky Shed Studio for my embellishments, perfect for this baby boy layout. I embossed them with Tim Holtz Distress Embossing Powder and then rubbed them with Perfect Pearls.  It's a  simple way to coordinate your embellishments with your paper.

"Trexdon"

Here are a couple close ups of the details.


Leaky Shed Studio Products

Thank you for stopping by the Leaky Shed Studio Blog today!!

Debbie

Wednesday, March 26, 2014

Bright and Fun Kites!

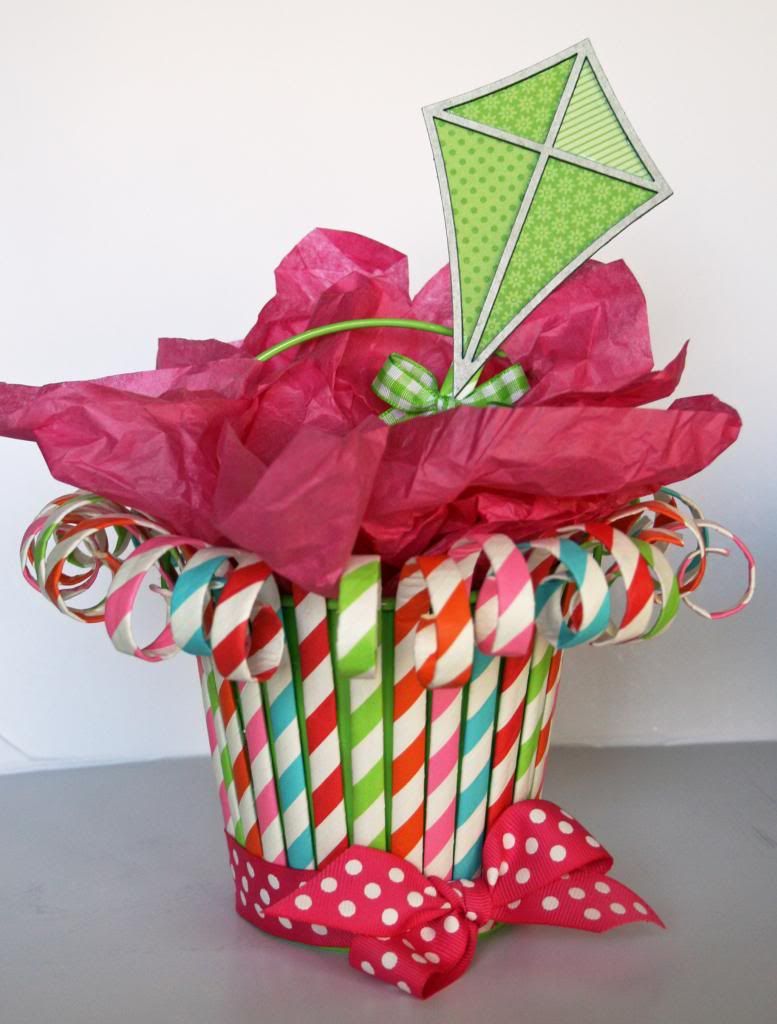
Hi everyone!  Robbie today to share a little card and bucket set that I made using Leaky Shed Studio Kites.  These little kites are so cute!  I decided that I wanted to do something bright and fun, since I'm so ready for blue skies and sunshine!


I came up with this little gifty set as a fun way to say thanks to someone special.


The card is just a pre-made Doodlebug card that I decorated using the little kites.  These are great and they come in a set of 3 which makes them perfect to mix-up with different colors and to work their way across more than one item.

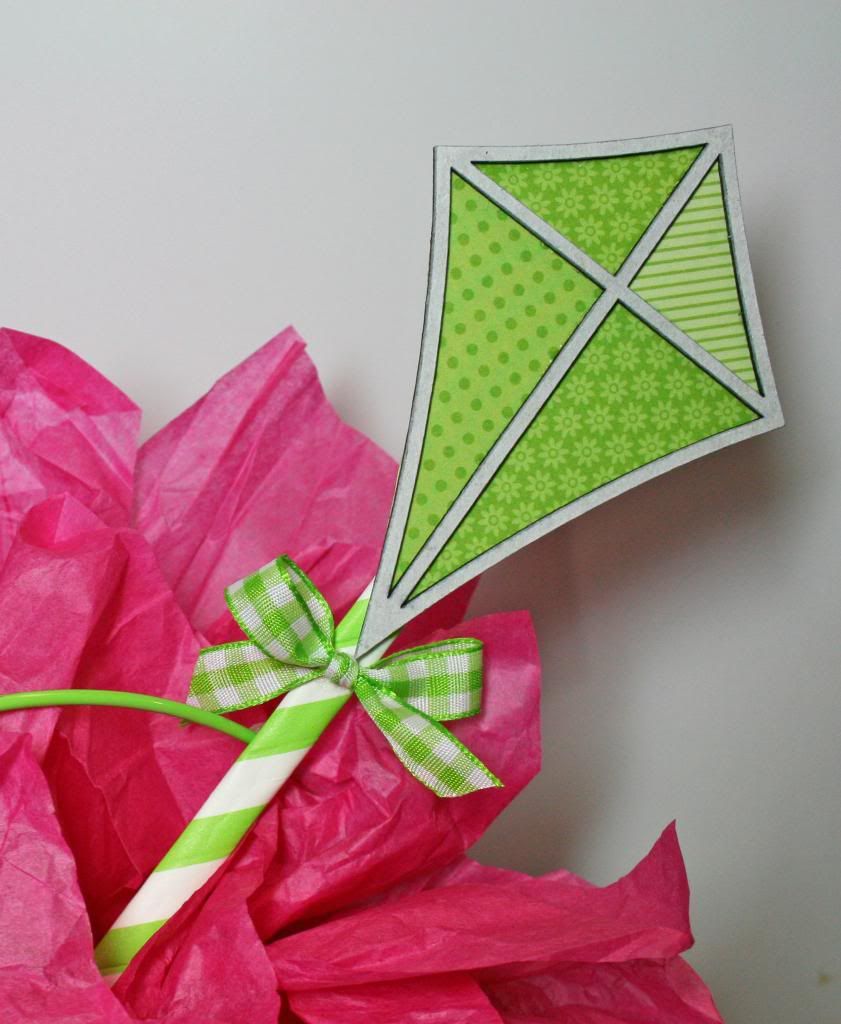
These were really simple to do.  I used Staz-on white ink to color them white and then glued patterned paper to the back.

Tip:  Don't worry about cutting the paper in advance.  Just glue them to a scrap, let it dry and trim along the edges.  The smooth design of these makes trimming really easy!


 Now, if you follow me at all, you know that I love gift sets and I'm a sucker for those little buckets that you find for about $1 at many stores!   I'm also having a hard time passing up all the adorable paper straws that you find everywhere these days.

On my blog, I have a quick step by step on my blog today to show you how I put the bucket together.  You can check it out here.  Just the Scrap


To finish my project, I added the last kite to the bucket.  I glued it to a straw and used it as a pick.  It would be really simple to  add a tag or sentiment to the straw, too.

Thanks so much for dropping by to see my project!  Don't forget to drop by My Blog to take a peek at my tutorial!

Tuesday, March 18, 2014

Encourage Imagination with Butterflies and Julie Nutting Dolls


Hi, Veronica here today for my first post with Leaky Shed!! 

I am so excited to be here and share with you my sweet tag using Leaky Shed's awesome Butterflies and Julie Nutting Chipboard Doll. I love making tags because they are little pieces of art.  Besides trading your little beauties you can also place them on a layout or album.  I have some of my tags framed so that they become Home Décor for your studio or any room in your home. You can even use them to decorate a present to a special person.
 
Spring Butterfly Small


Classy Girl 4 inch


My Steps:

Since the butterfly and Julie Nutting doll were the center pieces of my tag I wanted to alter those pieces first. My first step was to prime my chipboard with a base white paint.  After I heat set the base color I then colored the butterfly with alcohol inks.  Lastly I embossed the whole butterfly with clear thick embossing powder.


For the Julie Nutting doll my first step was to stamp the chipboard with a script stamp using stazon ink.  I then colored in her hair, shoes, skin and the outline of her dress with alcohol inks; the alcohol inks dried very quickly.  I then used turquoise paint for the folds of her dress to give it a sort of pattern.  After I heat set the paint I embossed the entire chipboard with triple thick clear embossing powder. 
.


I then created the background to highlight the chipboard pieces.  First I inked and spray misted the tag then used a stencil and molding paste for more texture.  After it dried I started layering leaves, diecut paper, flowers and ribbon.


I finished my tag with dyed binding ribbon and a cute butterfly charm.  I also used some Tim Holtz word stickers which I mounted on cardstock for my message
 
Encourage Imagination
 
I hope you enjoyed my tag as much as I enjoyed sharing and creating it for you.  Thank you for stopping by and I can't wait till it's my turn again to feature my next Leaky Shed project!


Happy Scrapping ...


Leaky Shed Studio Product: 
 
 
Classy Girl 4 inch (Julie Nutting)
Spring Butterfly small


Monday, March 17, 2014

Clock # 3

Happy Friday!  Maggi here to share a layout I did featuring our Clock #3. (I used a Mojo Monday sketch from the Flying Unicorn for my design.) I love the delicate scroll work around the clock, it fit so well with my vintage styled layout and photo.

I painted the clock with Splash of Color Silks in emperor gold and to stretch my chipboard I cut off the piece that would have been hidden under the photo and used it in my floral cluster on the right.  It makes a pretty base for my cluster, don't you think?

 The photo is of a homestead cabin on the Blue Ridge Parkway in NC at Mabry Mill.  I loved the bright skeins of yarn that had been spun on the old spinning wheel.


Supplies


Studio 75 Little Black Dress Collection
Petaloo Mixed Textures Flowers Amber
Petaloo Botanica Faux Dried Flowers Amber
Prima Audrey Flowers
Tim HOltz film strip ribbon

Friday, March 14, 2014

Back to School

Hi everyone Tiffany here. 
I have another fun mixed media layout to share with you. 
It is another layout of my son. I took these pictures at the beginning of the year. 


I used the My Minds Eye chalk studio paper. I used the Back To School phrase. I used a lot of sprays and mediums to create this fun background for my layout. 

Here is another photo. 


Thank you for stopping by. 


Wednesday, March 12, 2014

Masculine Card with Enameled Watch Parts and Barbed Wire

Hi, it's Tracey back to share a masculine card with you today. It's so easy to create feminine cards with flowers, lace, and flourishes for the ladies in my life, but coming up with more masculine ideas can be a challenge. The Leaky Shed Studio Watch Parts and Barbed Wire were such perfect accents to go grungy and masculine on this guy card.

"Enjoy the Journey" Card

Tips and Techniques
The Leaky Shed Studio Watch Parts are one of my favorite sets to work with. Here they fit the corner of my card so perfectly. Getting a grungy effect is so easy using Fran-tage embossing enamel in Aged Black. I simply pressed the pieces into my embossing pad, then sprinkled with the embossing powder and heat set. 

Another view of the gears.

This Leaky Shed Barbed Wire Border is so fun to work with. To fit the card, I simply trimmed one end along the looped edge. This time I used the Aged Silver embossing enamel. 

Another close-up of the barbed wire. You can also see my mixed media background. Stop by my blog tomorrow where I will be sharing my background details. 

My tip of the day is to be creative with how you use your chipboard. Don't be afraid to cut it up or to use only part of a set. You can use the leftovers on another project!! 

Leaky Shed Studio Products

Thanks for stopping by today!
I hope you've been inspired to grab some Leaky Shed Studio Chippies
and create a card for that special guy in your life. 

~ Blessings ~

Monday, March 3, 2014

Layout with Flourish #2

Maggi here to share a fun layout of my sweet grandson.  He started walking at 8 mos and let me tell you at 1 year old he could really move.  It was a full time job just keeping my eyes on him to keep him out of trouble, LOL!

Flourishes are so pretty to add to your clusters, they can be romantic, shabby chic or whatever you wish.  I've made our Flourish #2 playful by nestling the Mother Goose images in the curves of the flourish.  I heat embossed the flourish with Stampendous aged bronze embossing enamel.


Here you can see how all the pieces are popped up to give a 3D appearance.


Graphic 45 Mother Goose Collection